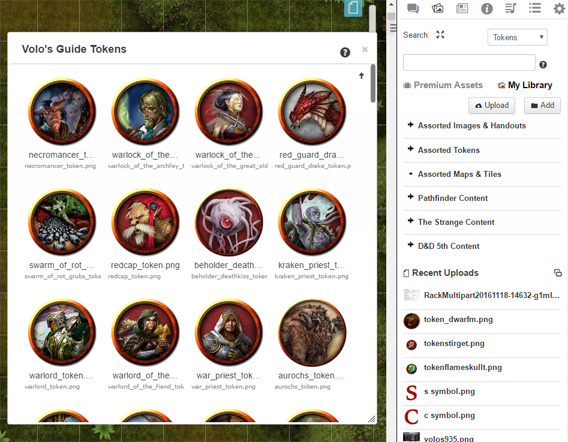
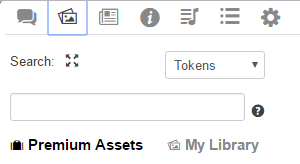
The Art Library is located on the second tab from the left in the Sidebar. The Art Library is always accessible in-game, permission to place items depend on your GM/Player status. This tab allows you to search, upload, and organize visual asset files that you wish to use in your game.
How do I search for art assets?
At the top of the Art Library tab is the image search bar. After running a search, the results will show up in this descending order:-
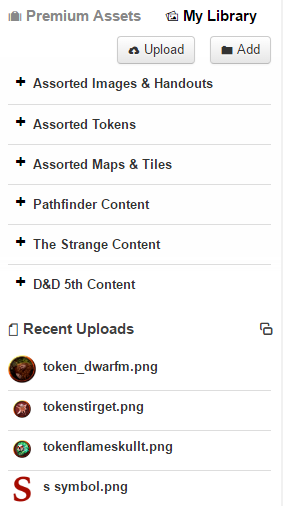
My Library: Any image you have personally uploaded to Roll20 which uses part of your account's allotted image storage (quota)
-
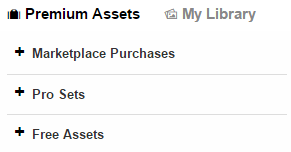
Marketplace Purchases: Any available image from an art set that you have bought off the Roll20 Marketplace
-
Pro Sets: Roll20 Pro Subscription grants access to in-app Exclusive Token Sets.
-
Free Assets: Includes free images for the Roll20 community to use in their games, but creators cannot use them in assets intended for sale on the marketplace.
-
Premium Assets: This lists popular items from the Roll20 Marketplace, highlighted in pale yellow. These assets have been created specifically for use in Roll20 by community members like you. Click on More Premium Assets to expand the marketplace offerings and view up to 100 different items. Simply select any image to make a direct purchase. This will open up the pack's Marketplace listing in a new window.
- From the Web: This section is shaded in light blue and pulls images cached from various TTRPG image resources around the web.
Web Search Notice: The web search tool, despite its name, does not search the web for assets. Instead it is serving cached results from the first year that Roll20 started. This tool uses a now deprecated Google search API that Google is no longer supporting. However, the cached results were kept because there were still a good number.
However, as sites continue to grow older and images removed, the results will degrade over time as they will point to non-existent entries. It is recommended to use web search assets as temporary placeholders and instead use uploaded assets for any permanent or longstanding portions of your games.
How can I use the search bar?
A Search for art on Roll20 matches keywords with image file names, tags, or asset folder names. Using multiple keywords refines the search to assets that match both words.. For example:
red dragon ...will return results that match "red" AND "dragon" together, but not just "dragon".
Boolean Searches
Optionally, you can use the OR keyword to perform a Boolean search, where results will be returned if either word matches.
examplewater way or swamp ...will return assets that match "water" AND "way", OR "swamp", but not "water" AND "swamp".
Exclusive Searches
You can also refine your search further by adding a "-" symbol before a word to exclude all results for that word.
examplegiant -fire ...will return results that match "giant" only if that item does not also have the keyword "fire".
ID Searches
You can search for specific art packs by searching for the ID# of a specific art pack. The ID# of an art pack can be found in the URL of the set when searching for it on the Roll20 Marketplace. The ID# itself is located after the word "set" and just before the item's name in the URL.
Example:
Item Set - https://marketplace.roll20.net/browse/set/575/thomas-time-1-characters
Searching for 575 in the search field will cause this set to appear in the search results.
What is the drop-down menu next to the search bar?
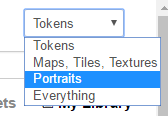
Above the search bar is a drop-down menu where you can choose the Image Search Type. This narrows the search to specific tags assigned to images on the Roll20 Marketplace, Pro & Free Assets, and collected resources from various TTRPG image sites. This is broken down into four categories:
- Tokens.
- Maps, Tiles, Textures.
- Portraits.
- Everything.
Choose the "Everything" option for the broadest search.
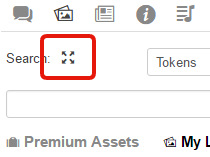
What is the "expand" icon above the search bar?
An expanding icon next to the word "Search" is located above the search bar :. This is the Search Style toggle. Clicking on this icon will swap between a small and large thumbnail display of the images found in the search results.
What is the difference between Premium Assets & My Library?
Below the Search Bar, there are two image indexes: Premium Assets and My Library. You can swap between the indexes at any time.
Everything under Premium Assets are images that you have bought, which are not counted towards your account's storage quota when you use them in your games. Folders for Marketplace Purchases, Pro Assets, and Free Assets are listed here.
Everything listed under My Library is content that you have personally uploaded into your games and stored on your Roll20 account. These images in My Library do count towards your storage quota.
How do I upload images to Roll20?
There are two methods for uploading art to Roll20. The first way is to click and drag an image from your file explorer/computer to the Tabletop to upload and place it where desired.
The second way is to click on the Upload button underneath My Library. This pops open a dialog box called Upload Files... This dialog box has a dashed-border rectangle where you can drag a maximum batch of ten images at a time to upload them all at once. You can select images one at a time with the Choose a file... button which brings up a file selection menu to browse for files on your computer/device. There is a file size cap for image uploads. If you have a free account, no single image or batch upload can exceed 10MB. For Plus and Pro subscribers, this file size cap is raised to 20MB.
Roll20 supports the following image file types: jpg, png, gif, animated gif, mp4, webm & PDF (you are only able to select one page from a .pdf for upload).
For information on optimizing your files for use on Roll20, see our Best Practices guideline.
What is the Uploaded Assets section?
Art files remain in the Uploaded Assets section regardless of their location within folders or subfolders. Organizing art into folders is only making a reference of the image. You can hide organized images in Uploaded Assets by clicking the overlapping windows icon next to the heading.
To permanently delete an image and clear it from your Storage Quota, double-click on the asset in Uploaded Assets.
What is the Storage Quota?
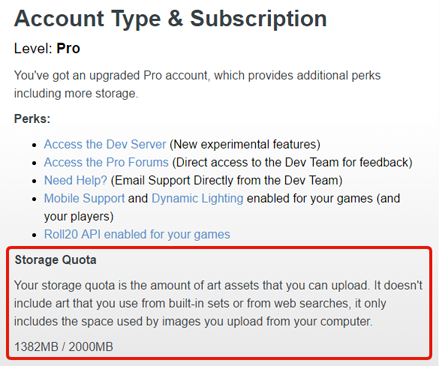
Storage Quota refers to the amount of space for storing assets in your account. It does not include art from marketplace sets or web searches, only images and audio uploaded from your computer. Roll20 allows a 100MB quota of art assets to be stored on a free account. Roll20 Subscribers are granted larger storage quotas. Plus accounts have a 3 GB quota and Pro accounts get 8GB.
You can check your Storage Quota usage on your My Account page underneath the Account Type & Subscription section on the right side of the page. You can see your storage quota at the top of the Uploaded Assets Folder View Window, directly above the first row of image thumbnails, and below the red deletion warning message.
How do I free up Storage Space?
You cannot upload any more images once you reach your storage quota capacity. Roll20 will not allow additional uploads until space is made available. This is either done by deleting some of your art images from My Library or upgrading your account to Plus or Pro subscriber status for a larger storage quota.
To delete art assets, you can right-click on an image in the Uploaded Assets list and choose Delete Item. This will permanently remove that art asset from My Library and any game that is currently using it. With that in mind, you will want to make certain that the images you are deleting are not necessary for the current game content you're actively playing with.
How do I put my images on the VTT?
To put your images onto the VTT you simply need to drag the asset from the Art Library in the right-side pane and drop it where you would like on the VTT.
Important to note, you need to drag the image file by the name. Dragging by the icon only allows for reorganizing and re-sorting of assets within your Art Library.
How can I organize my images?
There are two different ways to help organize the images in My Library: Folders and Tags.
What are Folders?
Much like the Journal tab of the Sidebar, folders can be used in the Art Library to help organize your images into subgroups.
Adding Folders: Add a new folder using the Add button underneath My Library. Follow the instructions on the prompt to name the folder and hit OK to add the folder to My Library.
Folder Options: Right click the folder to reveal this list of options: Add Subgroup, Sort A-Z, Rename Folder, Delete Folder
- Add Subgroup: This behaves exactly like clicking on the folder Add button. You'll get a prompt to enter a name for the new folder and once confirmed will create a new subfolder underneath the current one.
-
Sort A-Z: This will sort any images within the folder to be sorted alphanumerically. Any subfolders will be sorted and listed before any images.
- Note: Due to the limited space on the Sidebar, the nested folders can only go three sub folder levels deep.
- Rename Folder: This will bring up the prompt again to change the name of the folder.
- Delete Folder: This will delete the folder. Deleting folders will not delete any images contained inside. Those images will be moved back to Uploaded Assets. Using the Delete Folder option requires your approval upon use, confirm when prompted to initiate your action.
Known Issue
To enable dragging an image to the VTT from the top section, make sure it is nested within a folder. Then refresh the VTT.
Sorting Subfolders and Images
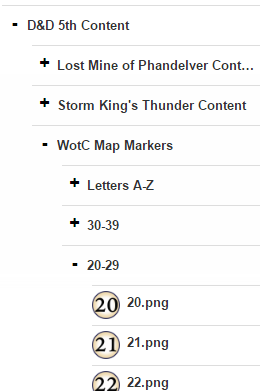
- Expanding and Collapsing the Folder Nest: Each folder and subfolder has an icon directly to the left of its folder name. This icon toggles between a + and a - symbol. Clicking on this icon either collapses the folder/subfolder (-) or expands it (+).
- Moving Folders: That same +/- icon beside the folder name is also a handle where you can click and drag to move the folder to a different location in the folder nest. A folder needs to be in its expanded state for a folder to be nested inside it.
- Adding Images into a Folder: Much in the same fashion you move a folder into a folder, you can click and drag images into an expanded folder. You can drag them directly from the Uploaded Assets list, or drag a batch selection from within the Folder View window. Just like adding subfolders, you need to make certain your target folder location for your image(s) is in its expanded state to place them inside.
What is the Folder View?
Clicking on an image in the Uploaded Assets list, an image in a folder, or on a folder/subfolder name opens a new window with larger thumbnails of subfolders and images within. Batch actions like mass deletion, selection, and relocation can be done here. You can add or remove tags to images in this view.
- Navigating to Nested Folders: Double clicking on a subfolder in Folder View will navigate and open the chosen subfolder in Folder View.
- Batch Image Selection: To select multiple images, click on each desired thumbnail while in Folder View. This will highlight each selected image in pale blue. To remove an image from a selection, just click on the image thumbnail to remove it from the current selection.
-
Right Click Options Menu: While inside Folder View, right clicking inside it brings up the following options menu:
- Select All: This will select every single image in the folder.
- Add Subfolder: This will add a subfolder (if able to do so) and prompt you to create a name for it.
- Tag Selected: This will add a Tag to all images currently selected. (See the Tags section for more info)
- Remove Tag: This will remove a specific Tag from all images currently selected. (See the Tags section for more info)
- Sort A-Z: This sorts all folders and images into alphanumerical order, folders are sorted first.
- Delete Selected: This will remove images from the folder. NOTE: If you delete images from the Uploaded Assets Folder View, you will delete them permanently and this cannot be undone.
- Batch Image Relocation: While you have a collection of images selected, you can click and drag the entire batch to a folder/subfolder in My Library to move all of them at once from one location to the next. Note: Your target folder location must be in expanded state to place images inside it.
What are Tags?
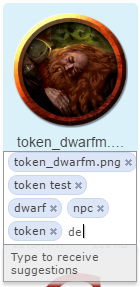
Adding Tags: To add tags to an image, go to the folder view (Uploaded Assets or a subfolder). Click on the image's file name above the upload date and file size to open the tag field. Press space or enter to create a tag and allow to enter another tag. For multi-word tags, copy and paste the phrase. Previous tag suggestions appear below the field, and you can navigate them with the arrow keys and set one by pressing enter.
Removing Tags: To remove tags from an image, you first need to bring up the tags field as if you were to add more. Each tag has an X following the tag name. Clicking on this X deletes the tag from the image. Sometimes due to tag length, the name may stretch past the boundary of the tag field. In this instance, you may not have access to the X to delete the tag. In this situation, you can also click on a tag, which highlights it in a dark blue and then hit the Delete or Backspace key to remove the tag.
Batch Tagging/Tag Deletion:* In folder view, select multiple images by clicking on them. A selected group will be highlighted in pale blue. Click again to remove an image from the selection. Right-click anywhere among the selected images to access the options menu.. Two of the available options is Tag Selected and Remove Tag. Selecting either of these two options will pop up a new dialog box asking you to type your desired tag to add or delete respectively from the selected batch of images. Note: You can only add or remove one tag at a time.
*We're aware that this feature currently doesn't work in the Uploaded Assets folder view. This is a known bug to be addressed.
Optimal Organization Method
We recommend this methodology every time you upload artwork:
- Upload your art for a given game/page/system
- Tag your images in the Uploaded Assets
- Sort your images out of Uploaded Assets into a sub-folder
If you stay on top of this process each time you upload new images, you'll have an easier time maintaining your art library and your storage quota.
How can I favorite Premium Assets into My Library?
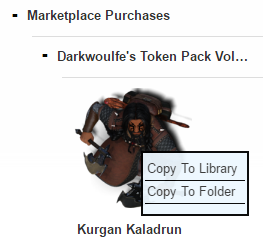
If there's a token, tile, or other image from the Premium Assets that you'd like to integrate into My Library, you can do this by right-clicking on an image from Marketplace Purchases, Pro or Free Assets, or from the Web. This will bring up two options: Copy to Library and Copy to Folder. Copy to Library will create a reference to this image and place it above the Uploaded Assets list and above any image folders you have. Copy to Folder will add a text entry below the option for you to type the name of the folder you wish to add the image to. Folder suggestions (when available) will list below after typing a few characters.
These images you'll be able to Tag, sort, and organize just like any other uploaded image asset in My Library. The important distinction with these copies is that these images are referring back to content in Premium Assets. They are not copying the images to My Library and therefore do not count towards your Image Storage Quota.
What about using my Art Library as a player?
Players can access their Art Library in their GM's games as well. While players cannot drag-and-drop onto the VTT, players can use their Art Library to set their character's Avatar and Token art. Just drag and drop the desired image onto your Bio page while in edit mode.
