The Journal is the third tab of the Sidebar. The Journal allows GMs to create Characters and Handouts and serves as a central repository for all of your game's information. The items in your Journal can be made private or shared with other players. Shared items can be viewed by players with access from this same tab.
Managing Character Sheets, Handouts, and Folders
In this tutorial, we explain the different ways to set up character sheets, how to make and share handouts with all of your players (or just one), and how to create and organize folders.
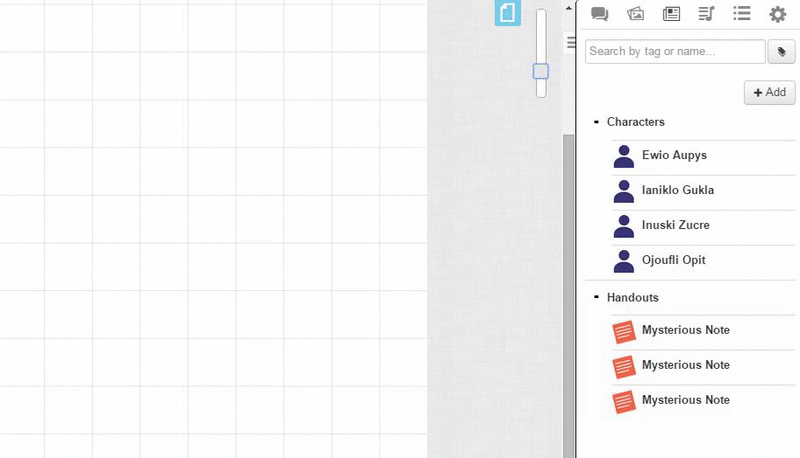
Characters
Character Journal entries can be used to represent PCs, NPCs, or anything that can benefit from the various features of Character Journals, including Character Sheets, Linked Tokens, and Attributes and Abilities macros.
Adding Characters
Add a new Character by clicking the "+ Character" button in the journal tab.
You can also add a character by right-clicking an existing folder in the Journal tab and selecting Add Character from the Folder Options menu. When you add new Characters or Handouts using the right-click method, they are placed directly into the folder you right-clicked on.
Players can also add characters if the option is enabled by the game creator.
Note: Characters created in this way still belong to the GM. The GM can edit, move, and delete any characters added to a game.
Regardless of how you create the Character entry, Roll20 will randomly generate a placeholder for the Character entry's Name.
When displayed on the Journal Tab, a Character Entry is represented by a default thumbnail icon, which looks like this: ![]() . This thumbnail icon will change if you add your own image to the Character's Portrait.
. This thumbnail icon will change if you add your own image to the Character's Portrait.
Character Right-Click Options
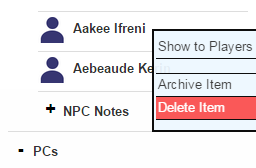
While inside the Journal Tab, right-click the Character's Name to reveal the following options:
-
Show to Players: The Show to players option will force the Character Window to open on your players' Roll20 client for them to view. If your players don't already have permissions assigned yet to view this entry, Roll20 will ask you to confirm whether you want to show the entry to everyone.
-
Archive Item: The Journal tab has an archival system. If you don't need to use Character or Handout entries during play, you can store them in your Archive for safekeeping. This can help with keeping your Journal tab organized. Archiving a Character will remove it from view in the Journal tab and place it in the Archive. The Archive is displayed at the bottom of the tab as soon as a single item is placed in it. Note that an archived Character still loads at game startup time, it is merely hidden from view. Archiving Characters is not a strategy for reducing your game size. Pro users have the option of using the Transmogrifier to store unused characters in a separate game.
- Delete Item: This option will permanently remove the Character entry from the Journal Tab. This can't be undone, so Roll20 will ask for confirmation before deleting the Journal entry.
The Character Window
Click the Character entry's Name from the Journal Tab to open it.
The Character Window Header
At the left hand corner is the ![]() Character Popout Button. Click this button to open this Character Window in a new browser window. This can be helpful if you are a GM or Player who uses multiple monitors. Visit the My Settings page to set popout windows to automatic. Click the Show to Players button to reveal the Character to all players or click the "Edit" button to customize your settings.
Character Popout Button. Click this button to open this Character Window in a new browser window. This can be helpful if you are a GM or Player who uses multiple monitors. Visit the My Settings page to set popout windows to automatic. Click the Show to Players button to reveal the Character to all players or click the "Edit" button to customize your settings.
The entry's Character Name is to the right of the Journal Popout Button. This is the display name of the journal entry. The display name refers to the entry in other parts of the game, such as macros, Chat As, or Token Representation.
On the right hand side of the Character Window are the following row of four buttons:
![]()
Show to Players Button: Clicking on this button functions the same way as the earlier mentioned Journal Entry Right-Click Option Menu.
-
Edit Button: Edit allows you to change various options for Character including Name, Token Image, GM private notes and Character Bio which is visible in the Bio and Info Tab. More specific in-depth discussion on Edit Mode is discussed there.
Note: To give a player access to view, edit, and control a character and their character sheet, follow these steps: Click the "Edit" button, add the player's name(s) to the "Can be Edited and Controlled by" and "in Player's Journal" fields, and then click "Save"
- Zoom Options Button: Clicking on this button gives you the ability to increase or decrease the zoom of all content within the Character Window. At default, the zoom is set at 100%. This affects the view of all tabs within this window.
- Close Window Button: Clicking on the X icon at the top right corner of the window will close it if you are in View Mode. If you are in Edit Mode, Clicking on the X button will revert you back to View Mode.
Character Tabs
The Character Window will either have two or three tabs of content depending on whether your game is using a Character Sheet. They are listed in this order:
-
Bio & Info Tab: This tab is where you edit the basics of the Character entry from Name, to its assigned Token, User Permissions, as well as a place to take PC and GM notes.
-
Character Sheet (optional): If your game is using a community or Roll20 created Character Sheet, it will show up on this tab.
- Attributes & Abilities: This tab is where you can create custom attributes and macros to roll dice formulas from. (Note: If you're using a Character Sheet, there will already be Ability fields created to be used by the Sheet.)
The following sections will go over each tab in detail.
Bio & Info Tab
All of the Character entry's settings are located in the Bio & Info Tab. Many of these Journal settings are hidden when the View Mode is active. Clicking on the Edit Button will allow you to customize these settings.
- Name: This will change the Character Name for this Entry.
-
In Player's Journals: By default, only the GM can view Characters in the Journal Tab. To allow other Players to view Characters in their Journal Tab, add their names to the "In Player's Journals" field. Player names are only available, if they have launched the game at least once. You can also choose "All Players" to allow everyone to view the Character.
For players who only have “view” permissions only the Name, Avatar, and any text typed in the Character's Bio & Info field. Players will not have access to the Character Sheet tab (if applicable) nor the Attributes and Abilities tab.
-
Can Be Edited & Controlled By: When players are added to the "Controlled By" field, these players have the following permissions:
- Players will be able to choose the Character from the "Speak As" drop down menu in the Text Chat.
- Players will be able to edit the Character's Name, Avatar and Bio & Info text field of the Bio & Info Tab.
- If the game uses a Character Sheet, they will have permission to view AND edit information on Character Sheet tab.
- Players will be able to control any Token set to Represent this Character. See Linking Characters and Tokens Together. You can also choose "All Players" to allow everyone to control or edit the Character entry.
- Tags: The Tags field allows you to add Tags to the Character entry. This allows you to quickly find the Character later by using the Search box at the top of the Journal tab on the Sidebar.
- Duplicate: Using the Duplicate feature will create a duplicate of the current Character entry on the Journal tab. This can be useful when using a Character entry as a template for creating new Characters.
- Archive: This button behaves exactly as the Right Click Option in the Journal Tab. Archiving the Character will put it in long-term storage. Once you have archived at least one Character or Handout entry, an Archive icon will appear at the bottom of the Journal Tab.
- Delete: Deleting the Character will permanently remove it from the Game. This cannot be reversed!
- Avatar: The Avatar is an image that represents this Character in the Journal listing as well as the Chat interface. The Avatar images replaces the default thumbnail. You can set an Avatar image if you Drag and drop an image from your computer, use the Choose a file... Button to select the image from a file explorer, or drag and drop an image from the Art Library into the box. You can remove the image at any time by hovering your mouse over the Avatar area and clicking on the Remove link that appears in the upper right of the square.
-
Default Token: The "Default Token" field lets you choose a token from your library or the tabletop to be used as the default token for your character when it is added to the table. Currently, there are two ways to select a default token:
- From the Art Library: Players and GMs have the ability to view and access their own Art Library, even if they are in someone else's game. Just select the desired token from your Art Library, and drag it onto the Default Token square to use it as the Default Token. This applies for both personal uploads and Marketplace purchases.
-
From The Tabletop: Just select a token on the Tabletop, then press the "Use Selected Token" button. A copy of the token will be stored, including any notes, player permissions settings, and bar values and links. If a GM or a player has permission to edit and control a character, they can drag and drop that character from the Journal listing onto the tabletop, and a new default token for the character will be added to the table.
- Edit Token Properties (GM Only): GMs can use this to create default settings for the Character's token. When these settings are saved, any future token dropped will have those settings applied. However, to apply the new settings to any tokens of the Character that are already dropped, the GM will need to use the Apply Token Defaults button.
- Apply Token Defaults (GM Only): After you've used the Edit Token Properties button to set up your ideal token settings, press Apply Token Defaults to apply the new settings across all Character tokens that have already been dropped on a map.
Once a Token is tied to a Character in the Journal, a Shift+Click on the Settings icon when a token is selected or Shift+Double Clicking on the token directly will open the attached Character; Alt+Click opens the character to the Attributes & Abilities tab. You can also drag and drop the character name from the Journal tab to add tokens directly to the tabletop once a token has been tied to its Character.
Please see the Linking Characters & Tokens Together section below on how link Token Bars to a Character's Attributes so they update at the same time!
- Bio & Info Field: The Bio & Info field allows you to input information about the Character.
- GM Notes Field: Use the GM Notes area to add additional notes that only the GM can see.
Character Sheet Tab
The Character Sheet tab for your character in the game closely resembles a traditional paper character sheet, providing all the essential information you need to know about your character, such as their abilities, skills, equipment, and attributes. Your GM will set this feature up if it's available for your game. To fill out the sheet, simply click on any field and enter your information. Some fields are auto-updated based on other information (for example, your Strength Modifier may auto-calculate based on the Strength of your Character). Character Sheets have roll buttons which you can click to quickly perform skill checks and other actions (such as attacks).
You can consult with your GM for the details on your specific game.
More information on Character Sheets, including how to set them up if you're the GM of the game, is available on the Character Sheets help section.
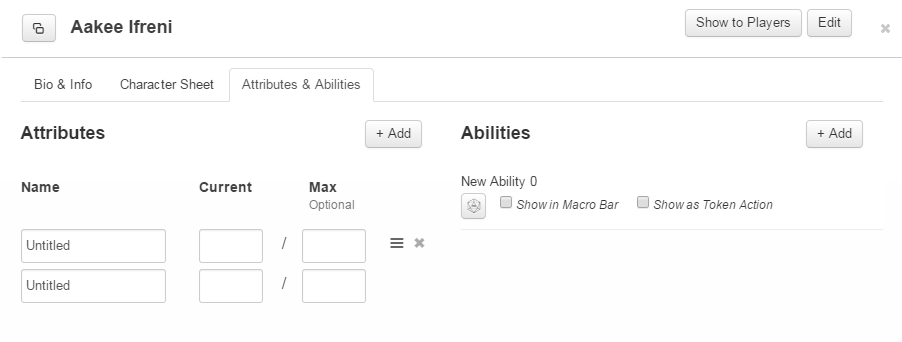
Attributes & Abilities Tab
The Attributes & Abilities Tab is used to track stats about the Character. The Tab stores dice rolls and other chat commands that are frequently used by that Character.
Attributes
You can add Attributes to your Character by clicking on the + Add Button in the Attributes column. Each Attribute requires a Name, as well as, a Current Value and an (optional) Max Value. Any players that you give permission to edit/control the Character entry will be able to edit and add more Attributes. Attributes can be used as variables in Macros and Abilities.
If you use an attribute call (e.g., @{AC}) outside of a tab in a Character Window, such as in a field on the Character Sheet Tab or an Ability on the Attributes & Abilities Tab, you need to specify which Character you are calling the Attribute from. For example, you could use the keyword @{selected|AC}.
Abilities
Abilities are designed to work with Attributes. Abilities work similar to Macros. You can input any valid chat command into an Ability. By using an Attribute that is assigned to a Character as a variable modifier, you can create complex Character specific Abilities.
When creating an Ability, type "@" to view a list of Attributes that can be used. Since the variable used in the Ability is linked to a Character Attribute, the value will sync when changed in the Character Sheet editor.
You can easily add and remove Abilities from your Macro Quick-Bar by selecting the Character from the Journal Tab. Shift+Clicking on an Ability on the Macro Quick-Bar will open that Character's Ability editor. Abilities can also be used as Token Actions which is a token specific macro feature.
Abilities can be called directly from the chat by typing them similarly to an Attribute. The format is %{<character name>|<ability name}, for example: %{Bob the Slayer|Massive Axe}
Finally, you can hover over Attributes and Abilities to drag and drop to re-order them or delete them.
Ability calls (e.g. %{Bob the Slayer|Massive Axe}) always require a keyword (e.g. the Character Name keyword; "Bob the Slayer"), even within a tab of a Character Window. (e.g. %{Massive Axe} won't work for Bob but %{selected|Massive Axe} can.)
Ability Command Buttons can be used to call Abilities from the text chat.
Handouts
Handouts are very similar to Characters and have some of the same fields. To add a handout click the "+ Handout" button.
Handout Dialog
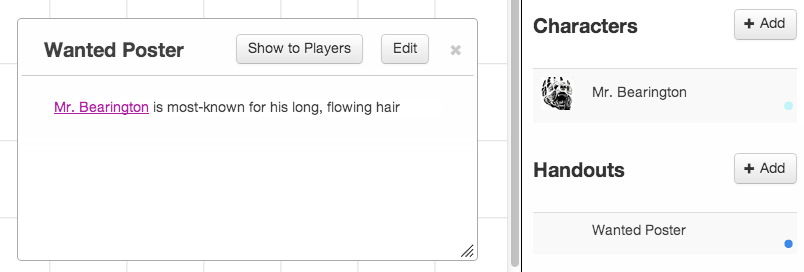
When you click on a Handout in the Journal Listing, the Handout Dialog is opened. In this Dialog, you can view the contents of the Handout, which may include an associated Image, Description and Notes text. A GM can view the GM Notes here.
If you include an image that is larger than the Handout Dialog, a magnifying glass will appear over the image. Clicking on the image in the Handout Dialog will display either the original dimensions or a full-screen version of that image.
The Name of the Handout is shown across the top of the Handout Dialog with several buttons:
Pop-Out Button
To the left of the Name, there is a button that appears as two overlapping rectangles. Clicking on this button opens a separate window outside of the Roll20 primary window. You can then place this window on a different monitor or switch between them using your operating system's native commands.
Show To Players Button (GM Only)
Located to the right of the Name, this button enables the GM to display the Handout Dialog on the screens of any players who have permission to View the Handout. If no player is allowed to View the Handout, a dialog will prompt the GM and ask if it should be shared with all players. Clicking Show to Everyone will insert All Players into the In Players's Journals field of the Handout (see below).
Edit Button
The GM and any players included in "Can Be Edited By" always have access to this button. (see below). Clicking this button will move the Handout Dialog into the Editing view.
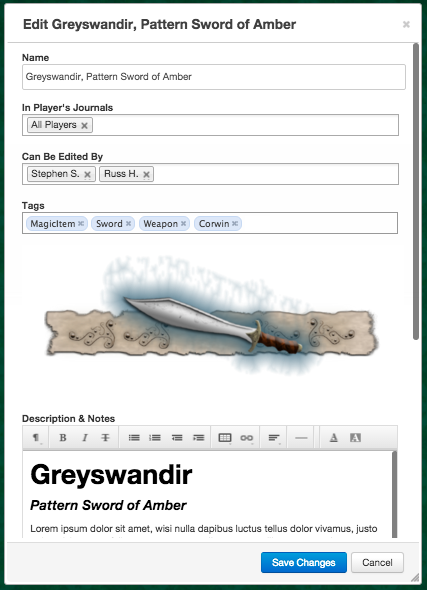
Editing
The Editing view of the Handout Dialog allows GMs and players who can Edit to make changes to the Handout.
Name
You can change the default text of Mysterious Note to your preference. This will be the title of the Handout in the Journal tab, and will show across the top of the Handout Dialog when it is opened.
In Player's Journals (GM Only)
The GM is the only person that can see a Handout by default. You can allow viewing by select players by putting their name in this field, or select All Players to allow access to all. Players can view their Handouts at any time, which are displayed in the folder designated by you along with the folder name. You may want to move a handout before allowing your players to view it. For example, if the handout is stored in the Cursed Items folder.
You can drag and drop a Handout from the Journal tab in the right sidebar onto your player. That player will be given permission to view the Handout which appears on their screen immediately.
Can Be Edited By (GM Only)
Similar to the In Player's Folder, by default only the GM can edit a Handout. Placing a player's name in this field allows that player to both View and Edit that Handout. This is particularly useful for allowing players journals or secret notes for correspondence with the GM. The same notes about folders apply as with the above.
Verifying Journal Permissions
To definitively see what a specific player has access to in their Journal, use Player View. It shows the Journal exactly as that player sees it.
Tags (GM Only)
The Tags field allows you to assign words to associate with this Handout which are useful for finding it later via the Search field or the Tag List Dropdown.
Image
You can upload an Image to represent this Handout in the Journal listing. Just drag and drop an image from your computer, or drag and drop an image from the Art Library search results into the box.
Description & Notes
Using this field, you can link a block of text with the Handout in a freeform manner. This text is visible to players that can View the Handout and is editable by players that can Edit the Handout.
GM Notes (GM Only)
This field is just like Description & Notes. Only a GM can edit and view this field, regardless of other settings.
Duplicate Handout (GM Only)
The Duplicate Handout button creates a copy of the handout, named "Copy of (name of handout)", which will appear at the bottom of the journal. When multiple copies of the same Handout are created, they are all initially named "Copy of...". You can rename the entries as required.
Archive Handout (GM Only)
The Archive Handout button will move the Handout to a special area where it will no longer show up in the Journal Listing or in results from the Search field or Tag List Dropdown. Archived handouts can be accessed in the Archived Handouts Dialog at the bottom of the Journal Listing where they can be restored.
Delete Handout (GM Only)
The Delete Handout button will prompt for confirmation and then permanently remove the Handout from the Game.
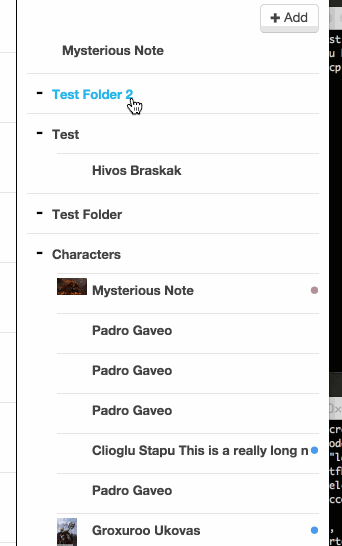
Organizing Your Journal Entries
Folders can be used to help organize Characters and Handouts within the Journal. Players and the GM can view folders and the complete folder structure as long as there is at least one item in each folder. If a folder contains items that are only available to the GM's journal, the players will not see that folder.
Adding Folders
Add a new folder using + Add button as described at the top of this page, making sure to select Folder from the dropdown menu. Follow the instructions on the prompt to name the folder and hit OK to add the folder to the Journal.
Folder Options
Right-click the folder to reveal a list of options. Add Subfolders, Characters, and Handouts using this method to automatically place 4 additional folders under the right-clicked folder. Items can also be moved in and out of folders manually using the mouse. See Reorganizing Journal Items for more detail. You can sort alphabetically and rename the folder from this menu as well.
Deleting Folders
When you right-click a folder, a list of options for deleting that folder is shown. Those options are as follows:
- Delete Folder: Selecting this will delete the folder, but will not delete the items inside. All items in the deleted folder will be moved to the root folder. Using this option requires your approval upon use, confirm when prompted to initiate your action.
- Delete Folder and its contents:This will delete the folder and its content, including Characters, Handouts, and other items. Using this option requires your approval and confirmation when you initiate the deletion.
Reorganizing Journal Items
Hover your mouse over the item you wish to move. Grab the "handle" that shows up along the left-side of the item name. Drag the item just below the folder that you want to move it to and then move the file to the right before dropping it in the folder.
Minimizing Journal Entries

You can minimize journal entries by double clicking upon any opened character journal or handout. This will shrink the item down to a small translucent title bar with the name of the entry on it and a couple buttons listed on the bar’s right side. You can click and drag this title bar to wherever is most convenient on the browser. To maximize the journal entry again, simply double click on the minimized title bar.
While minimized, the Edit button is still available to access for both character journals and handouts. In the case for handouts, there is also a “Show To Players” button option.
You can close minimized journal entries by clicking on the X button on the far right of the title bar.
Note: If you close a minimized journal entry it will remain so when you open it again from the Journal Tab on the Sidebar
External Journal Access
If your GM is a Plus or Pro subscriber, you can easily view your External Journal entries outside of the app. Located on the Game Details page, under the Content dropdown menu, along with access to your Chat Archive and Game Forums.

This is great for checking up on things in-between gaming sessions without requiring you to join the game. You can keep the External Journal open in a separate tab or browser window, or even on another screen.
The External Journal updates in real-time. So if a change is made to a character’s biography, you don’t need to reload, you will see the change right away. This really enables you to use the External Journal as a play aid during your Roll20 games.
Journal Command Buttons
Within the Bio & Info and GM Notes text fields of a Character, or the Description & Notes and GM Notes text fields of a Handout, you can create Journal Command Buttons. These are special hyperlinks that can output macros to the Text Chat when clicked.
Here is how to create a Journal Command Button within one of the aforementioned fields:
- Insert a link using the link button on the redactor toolbar.
- At the very start of the "URL" field of the Link Window, type a backtick character: `
- Add in your macro code after the ` character.
- Give your Journal Command Button a label using the "Text" field.
- Press the "Insert" button and Save Changes; you have created a Journal Command Button!
Another way to create Journal Command Buttons is to copy and paste an Mod (API) Command Button or Ability Command Button from the Text Chat into one of the aforementioned text fields.
Note: Journal Command Buttons will not work if you have the Use Window Popouts for Characters option enabled.
Link Between Journal Entries
As of 08/20/2021, multiple Compendium entries of the same name can exist in your Journal tab. With this update, it is not possible to link to journal entries of the same name at this time. However, we are planning on addressing this in a future release.
You can easily link your journal entries together inside the game.
Just put single brackets around the name of a character or handout. For example: “[Mr. Bearington] is most-known for his long, flowing hair”. When you save the entry we will automatically create a clickable link that will open that other journal entry.
The link works both inside and outside the app and respects the player´s permission. Thus a player can’t open a handout they don’t have access to, even if they see a link to that handout.
You can use the links in character bios, GM notes (both for characters and tokens), and handout notes fields. Use links to tie entries together, or even create a “table of contents” page for your game to quickly access your most-used journal items.
Linking Characters & Tokens Together
You can take token assignments one step further when linking them to a Character Journal.
For PCs or Named NPCs
The following setup is ideal for tokens that represent a single character, whether that token represents a player character or a prominent villain (i.e. not meant for stock monsters or creatures).
- Before linking the token to your character journal, open up its Token's Settings window by double clicking on the token, or clicking on the gear icon.
- Select the desired Character Name for this token from the drop down menu for "Represents Character". This drop down menu lists every available character journal entry in alphanumerical order.
- For Bars 1, 2, and 3, click on the adjoining drop down menus to choose the relative attribute fields of the character journal. This will include ones you have created and ones that may be used by a Character Sheet (if applicable). The current hit point value of a character is a suitable attribute to keep track of for convenience.
- Save your changes and close the Token Settings window
Linking to a Compendium Page
If your game uses a compendium, links to that compendium in handouts and character sheets will automatically open in the in-app compendium. Use the full URL in the link in the text editor, including the https:// part of the URL, but do not include bookmarks and arguments (anything that starts with ? or # in a copied URL).
Journal Tab Expansion Sources
Journal tab entries that have been added from the Compendium tab have a book title abbreviation and publisher icon. This source information was added in an update on 08/20/2021 to help distinguish Compendium entries with the same name, but different source information. Check out an example below:
Visit the Compendium in Journal tab FAQs page for more information.